 When I moved into my apartment in Chelmsford Street, Newtown,
on Anzac Day in 1990 I had some N-scale
rolling stock I had bought on a trip to Europe in the late 1980s.
Living in an apartment and having a healthy social life delayed anything
happening in the model railway direction.
However I eventually had a clever idea for a very small layout. A little was
done, the basic chassis.
When I moved into my apartment in Chelmsford Street, Newtown,
on Anzac Day in 1990 I had some N-scale
rolling stock I had bought on a trip to Europe in the late 1980s.
Living in an apartment and having a healthy social life delayed anything
happening in the model railway direction.
However I eventually had a clever idea for a very small layout. A little was
done, the basic chassis.
This half-built layout was eventually packed with all my other stuff
to come to California, in 1998.
This is a picture of me and my posessions in the front garden of our
block of apartments, everything carefully wrapped in cardboard.
Which of these packages is a model railway? You will soon be able to guess.
This is the track plan, not to scale:

This is the view from above, as unpacked, eventually, in Santa Rosa.
Track, no scenery.

Operating dimensions: 17' by 6". Packed-up dimensions: 8'x6"x6".
Spotted the package yet?
 Here is Edwin pointing to the layout in its "packed" condition. The box is about
8' long, and a bit less than 6" square in cross section.
It is held together by two screws, one inserted at each end.
You can make out the irregular crack along the side of the box where it splits into
two halves. The crack is irregular as each half has a unique set of side walls.
Here is Edwin pointing to the layout in its "packed" condition. The box is about
8' long, and a bit less than 6" square in cross section.
It is held together by two screws, one inserted at each end.
You can make out the irregular crack along the side of the box where it splits into
two halves. The crack is irregular as each half has a unique set of side walls.
The top and bottom are gray, rather than black, because these are removable
panels that conceal the wiring and point solenoid motors.
These panels are removable for service, or for the future installation
of building or station lighting, signals, etc.
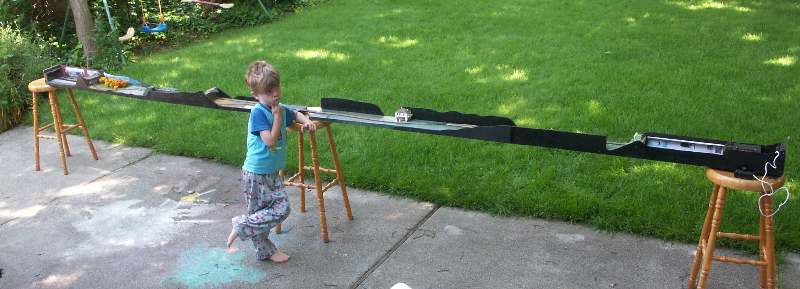 Here is Edwin showing off the layout opened up, and under construction.
As you can see it is remarkably long, once the two parts are
separated and placed end-to-end, joined with a bridge
(hidden behind Edwin).
You can clearly see the irregular walls. These have images pasted onto them
to create dioramas in each section.
Here is Edwin showing off the layout opened up, and under construction.
As you can see it is remarkably long, once the two parts are
separated and placed end-to-end, joined with a bridge
(hidden behind Edwin).
You can clearly see the irregular walls. These have images pasted onto them
to create dioramas in each section.
This layout is particularly hard to portray in photographs. The
depth of field is grossly inadequate even with minimum aperture,
but with dimensions like this there is no view that makes it
possible to see what you can see "up close and personal" anyway.
The layout is divided into sections or "areas" by means of
short tunnels, bridges, cuttings, etc.,
as you can see from the picture below of the finished layout halves placed
adjacent to each other.
The theme for the sections was suggested to me by another trip to Europe
that I took in 1995 with Kay, during which we took the Chunnel across to
Paris and another train to Lyon en route to staying with Warwick
in Cannes. In particular I knew I would need a theme for a section
that had to be dead flat to mate with the control section and underground station
that occupied the strict maximum height.
The salt pans we had seen along the South coast of France fitted that
bill very well.
There had been other European trips by the time I got around to finishing the
layout (2005), and some German flavour was added.

The most difficult aspect of the design is ensuring that each section
of the layout contains objects so placed as to not collide with an object
on the other half, when the two halves are mated for packing away.
The tunnels occupy almost the full height of the space inside the package when
the two halves are mated!
The length of the layout is divided into the following sections,
starting from top left in the photo above: The control area that
contains the transformer, a walkaround Gaugemaster controller,
and buttons for control of the points (switches); the underground station;
the farm; the forest station; the Bavarian village; the bridge (shown stored
at the far right end of the lower run, in the docks area, where it is held
by velcro); the salt pans starting the second half;
the bypass station (and a "fiddle" area, visible from above
but hidden in normal view, and used to represent "the rest of the
world"); the deciduous forest; and the docks.
 Looking at each section in turn, we start with the tube station.
Here is a view of it.
It is constructed with an actual piece of pipe... what could be more appropriate?
Merinda and I painted the figures.
The second track is purely cosmetic.
Looking at each section in turn, we start with the tube station.
Here is a view of it.
It is constructed with an actual piece of pipe... what could be more appropriate?
Merinda and I painted the figures.
The second track is purely cosmetic.
The tube station has billboard advertisements. Some are quite genuine
adverts taken from pictures I took on various visits to London,
or sent to me by Danny (particularly the one for Kew Gardens).
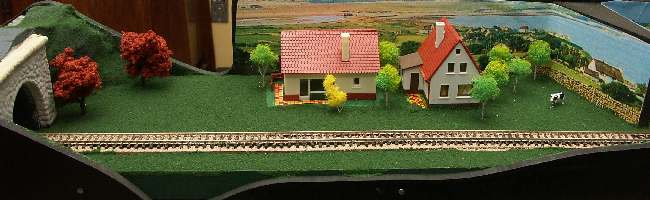 Here is the farm area, into which the trains go after the underground station.
Note the use of appropriate wallpaper to give the impression that the layout
is not so very narrow.
An image of Cornwall Downs provides the backdrop.
Merinda pained a cow with a black-and-white Holstein pattern, to match my trousers.
Here is the farm area, into which the trains go after the underground station.
Note the use of appropriate wallpaper to give the impression that the layout
is not so very narrow.
An image of Cornwall Downs provides the backdrop.
Merinda pained a cow with a black-and-white Holstein pattern, to match my trousers.
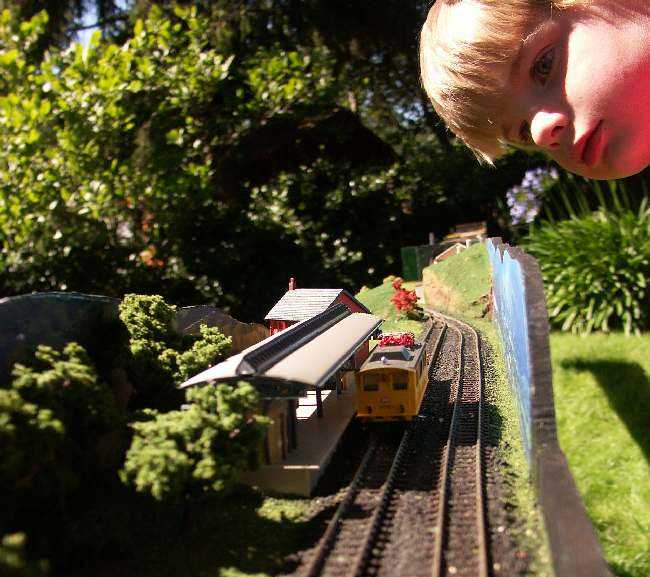 The forest station is difficult to portray because of its
sidewalls; here Edwin is looking at a track cleaner at the station,
photo taken from the farm end.
The forest station is difficult to portray because of its
sidewalls; here Edwin is looking at a track cleaner at the station,
photo taken from the farm end.
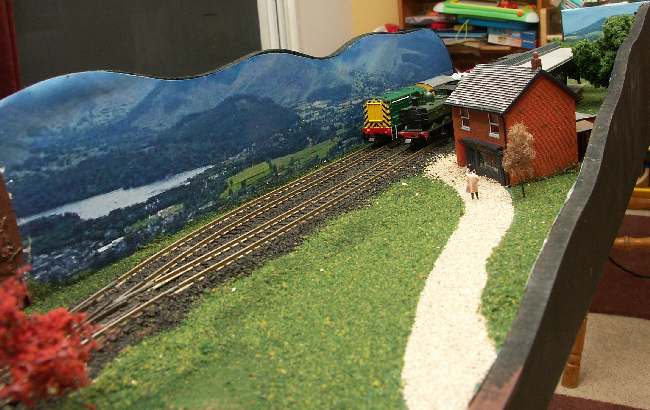 And here is the same section viewed from the other end.
You can make out two trains, the steam locomotive is in the station.
In front is the bakery.
And here is the same section viewed from the other end.
You can make out two trains, the steam locomotive is in the station.
In front is the bakery.
 Here is the railcar going through the Bavarian village, about to enter the tunnel
through to the bridge.
The Bavarian village backdrop was kindly provided by Google's Image search
facility.
Here is the railcar going through the Bavarian village, about to enter the tunnel
through to the bridge.
The Bavarian village backdrop was kindly provided by Google's Image search
facility.
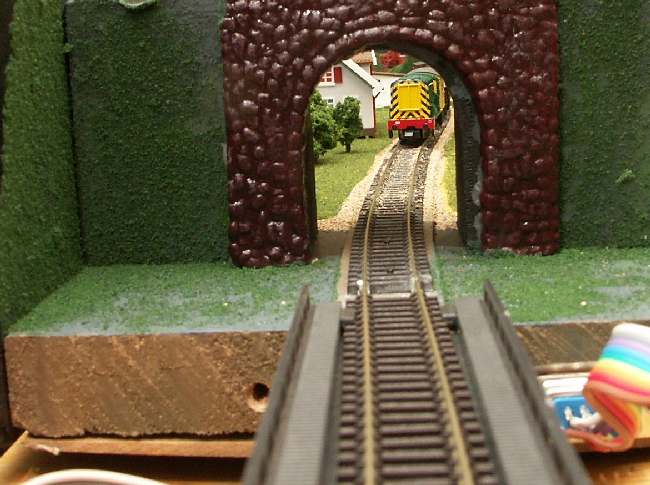 Here is the view from the bridge through the tunnel to a train
approaching through the Bavarian village.
You can see a glimpse of the ribbon cable that connects the
two halves to supply power to the motors mounted below the
track.
Here is the view from the bridge through the tunnel to a train
approaching through the Bavarian village.
You can see a glimpse of the ribbon cable that connects the
two halves to supply power to the motors mounted below the
track.
 Here is an aerial view of the salt pans and the bridge, again
showing the interconnect cable.
Here is an aerial view of the salt pans and the bridge, again
showing the interconnect cable.
 Here is a view of the bypass station.
Note the collection of shopfront images used to give an
impression that this is a busier part of the world.
The fiddle yard is in the section behind the shopfronts.
Here is a view of the bypass station.
Note the collection of shopfront images used to give an
impression that this is a busier part of the world.
The fiddle yard is in the section behind the shopfronts.
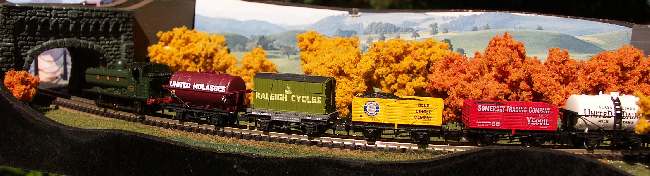 That same steam train is now going through the deciduous forest
on its way to the docks.
That same steam train is now going through the deciduous forest
on its way to the docks.
 Here we are finally at the docks. This part of the layout was inspired by
a visit many years ago to Bristol in the UK.
Here we are finally at the docks. This part of the layout was inspired by
a visit many years ago to Bristol in the UK.